Hi,
I only have the refinement Job from a old workflow (import, ctf, extracts, etc, all deleted)
Can I use the known locations of this job to re-extract the particles from another Import>CTF
what is the procedure to do that?
regards
Hi,
I only have the refinement Job from a old workflow (import, ctf, extracts, etc, all deleted)
Can I use the known locations of this job to re-extract the particles from another Import>CTF
what is the procedure to do that?
regards
Hi @asgodoy,
If your old workflow was from an instance running a recent version of cryoSPARC (v2.11+), you should be able to hit the “Export” button under the particles group in the “Output” tab of the Refinement job. Doing so will consolidate the particle stack into a single folder (explained here).
The reason you need to do this is because you’ll need to manually modify the particle stack to re-associate them with the movies you re-imported. When you extract particles from micrographs, the particle .cs file store the micrograph’s UID to remain associated with them. If you ever want to re-extract the particles, you can just connect the particle locations and the micrographs to the Extract from Micrographs job, and it will cut out the locations. Since you’ll be re-importing the movies and creating new micrographs (which have different UIDs), you’ll need to re-associate them to the particles. Luckily, the particles also store the path of the micrograph they came from, so we will use that to do so.
Once you’ve exported the particles, navigate to the “Overview” tab to find where they’ve been extracted to:
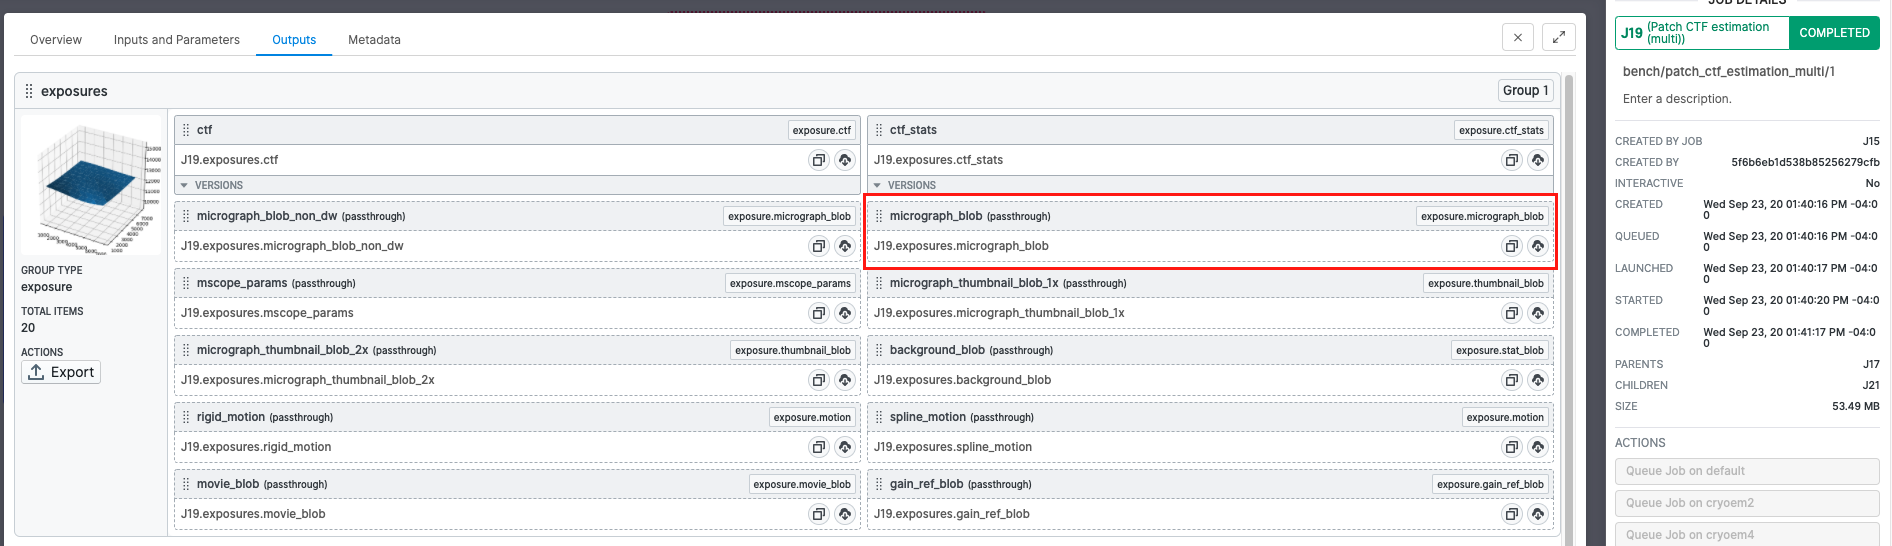
You will also need to find the .cs file of the micrographs you have just completed CTF Estimation on. To do this, navigate to the “Outputs” tab of the Patch CTF job, and press the first button in the micrograph_blob result group to copy the path of the .cs file:
Using these paths, we will use Python to open and edit the file. I’ve already explained the preliminary steps to do this in the following article, so I will skip to the part where we actually edit the file.
You can also check out a similar topic where we need to manipulate .cs files:
Once you have the exported particle .cs file (particle_dset) and the micrograph_blob .cs file (micrograph_dset) opened in a python shell, do the following:
STALE- SEE NEW CODE BELOW
for index, particle in enumerate(particle_dset.get_items()):
    # get the micrograph path associated with the particle
    path_to_match = particle['location/micrograph_path']
    # get the corresponding micrograph using this path
    corresponding_micrograph = micrograph_dset.subset_query(lambda x: x['micrograph_blob/path'] == path_to_match)
    # store this micrograph's uid
    new_mic_uid = corresponding_micrograph.data['uid'][0]
    # assign the uid to the particle dataset
    particle_dset.data['micrograph_uid'][index] = new_mic_uid
To briefly cover the functions used:
get_items(): returns a “Spooling List” generator object which contains each item in the original dataset as a “Dataitem” (allowing you to access the row of each item in the original dataset as a dictionary)
subset_query: returns a subset of the original dataset by executing the match argument (in this case a lambda function) on each item in the original dataset.
Once this is done, you can save the particle dataset (particle_dset), and import it back into cryoSPARC using the Import Result Group job (also covered in the tutorial linked above). You can then connect the imported particle group and the new micrographs to an Extract from Micrographs job to re-extract the particles.
Hi @stephan
We had to repeat the motion correction due to the wrong gain application in the original motion corrections job. We would like to extract our already processed particles from the new motion-corrected and CTF estimated micrographs.
I have followed your instructions here and I get this error
Traceback (most recent call last):
  File "a7cs_reassign_mics.py", line 23, in <module>
    new_mic_uid = corresponding_micrograph.data['uid'][0]
IndexError: index 0 is out of bounds for axis 0 with size 0
Would you please help me understand where is the problem? Thank you. Here is my code.
#bash commands
eval $(cryosparcm env)
export PYTHONPATH="${CRYOSPARC_ROOT_DIR}"
python reassign_micrographs_uid.py
#python code for reassign_micrographs_uid.py
import numpy as n
# https://discuss.cryosparc.com/t/re-extract-particles-after-losing-correspondence-to-original-micrographs/5248/2
# dataset is the main module required to interact with cryoSPARC .cs files
from cryosparc_compute import dataset

particle_dset = dataset.Dataset()
micrograph_dset = dataset.Dataset()

dataset_path = '/path/to/P37_J253_particles_exported.cs'
particle_dset.from_file(dataset_path)

micrographs_path = '/path/to/P37_J350_passthrough_exposures.cs'
micrograph_dset.from_file(micrographs_path)

output_path = '/path/to/test/P37_J253_particles_micidchanged.cs'

for index, particle in enumerate(particle_dset.get_items()):
    # get the micrograph path associated with the particle
    path_to_match = particle['location/micrograph_path']
    # get the corresponding micrograph using this path
    corresponding_micrograph = micrograph_dset.subset_query(lambda x: x['micrograph_blob/path'] == path_to_match)
    # store this micrograph's uid
    new_mic_uid = corresponding_micrograph.data['uid'][0]
    # assign the uid to the particle dataset
    particle_dset.data['micrograph_uid'][index] = new_mic_uid

particle_dataset.to_file(output_path)Hey @alburse,
That’s odd, your code seems fine. If you’d like, send me micrograph and particle dataset files (/path/to/P37_J350_passthrough_exposures.cs and P37_J253_particles_exported.cs) to my email (sarulthasan@structura.bio) and I’ll take care of re-associating them. I’ll post what I had to change in the code here once I’m done.
Thank you, I will send it asap.
Alpay
Hi @alburse,
Thanks for sending over your .cs files so I can debug the code. I forgot we had changed the naming conventions of the paths written out by cryoSPARC, which means if you’re doing a path comparison, you’ll have to “normalize” both paths before being able to compare them (seen below in clean_path_to_match).
Here’s the updated (and much more efficient) code to re-associate extracted particles with newly imported exposures:
import os
from cryosparc_compute import dataset
exp_dset = dataset.Dataset().from_file('/path/to/exposures.cs')
particle_dset = dataset.Dataset().from_file('/path/to/particles.cs')

def clean_path_to_match(path):
    # get the basename of the micrograph
    output_path = os.path.basename(path)
    # remove any leading characters in the path
    output_path = output_path.strip('>')
    # remove any leading UIDs in the path
    output_path = '_'.join(output_path.split('_')[1:])
    return output_path

path_to_uid_map = {clean_path_to_match(path):exp_dset.data['uid'][idx] \
    for idx, path in enumerate(exp_dset.data['micrograph_blob/path'])}

for index, particle in enumerate(particle_dset.get_items()):
    # get the micrograph path associated with the particle
    path_to_match = clean_path_to_match(particle['location/micrograph_path'])
    # assign the uid to the particle dataset after lookup
    particle_dset.data['location/micrograph_uid'][index] = path_to_uid_map[path_to_match]

particle_dset.to_file('/path/to/particles.cs')
This worked well. Thank you again.
Just couple of corrections
The last command should be particle_dset.to_file instead of particle_dataset.to_file and the final file should be saved the same name as the initial exported particle cs file at the same path. You will then import the csg file of the exported particles which will then refer to the cs file you just created and replaced.
Great, thanks! I’ll make those changes.