August 2021 Update: The instructions below are no longer required for cryoSPARC v3.2 or newer. Instead, create a new extraction job, connect the particles from the first picking job and connect the exposures from the second motion correction job.
Hi @jianhaoc, yes you can do this but it’s a bit complicated. The particle locations are tied to the path of the motion-corrected micrographs on disk. That means you’ll have to duplicate the particle locations and manually modify the “path” component of the location. Here’s how to do that.
-
Copy the
micrograph_blobpath from the J2 outputs as indicated. Note this down somewhere -
Export the job you used to generate the particle locations from the micrographs in J1 (A). Note down the path of the exported job (B), as indicated (I’m using a Blob Picker job for this example)
The directory structure of this exported path should look something like this (assuming J3 is the job that generated the particles)
/path/to/project/exports/jobs/P1_J3_blob_picker_gpu
├── events.bson
├── gridfs_data
│   └── gridfsdata_0
├── job.json
├── P1_J3_micrographs
│   ├── J1
│   ├── J2
│   ├── P1_J3_micrographs_exported.cs
│   └── P1_J3_micrographs_exported.csg
└── P1_J3_particles
    ├── J1
    ├── P1_J3_particles_exported.cs
    └── P1_J3_particles_exported.csg
Note the full path to the exported particles data file (e.g.,
P1_J3_particles_exported.cs) -
Paste the following code into a text editor and make the substitutions below
from cryosparc_compute.dataset import Dataset micrographs_path = '<J2 MICROGRAPHS PATH HERE>' exported_particles_path = '<J1 PARTICLES CS PATH HERE>' micrographs = Dataset().from_file(micrographs_path) particles = Dataset().from_file(exported_particles_path) mic_uid_to_path = dict(zip(micrographs.data['uid'], micrographs.data['micrograph_blob/path'])) for particle in particles.get_items(): particle['location/micrograph_path'] = mic_uid_to_path[particle['location/micrograph_uid']] particles.to_file(exported_particles_path)- Change
<J2 MICROGRAPHS PATH HERE>to the J2 micrograph blob path from Step 1 - Change
<J1 PARTICLES CS PATH HERE>to the full path of the exported particles data file from Step 2 (e.g.,/path/to/project/exports/jobs/P1_J3_blob_picker_gpu/P1_J3_particles/P1_J3_particles_exported.cs) - If you’re running cryoSPARC v2.16 or below, change
cryosparc_computetocryosparc2_compute
- Change
-
Open a terminal with access to the
cryosparcmcommand line interface. Entercryosparcm iclito enter interactive CLI mode -
Paste the substituted code from Step 3 into the prompt and press
Enterto run it. Check for any errors in the output before proceeding -
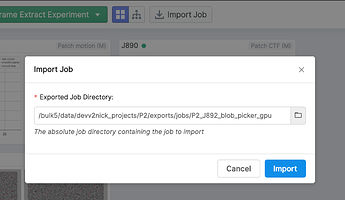
Use the “Import Job” button to re-import the exported job with the now-modified particle locations
You may see an error notification, which you may safely ignore
-
Extract the particles from J1 as you normally would
-
Extract the particles from J2: Create an Extract Particles job, connect the micrographs directly from J2 and the particle locations from the imported job at Step 6. Run the job
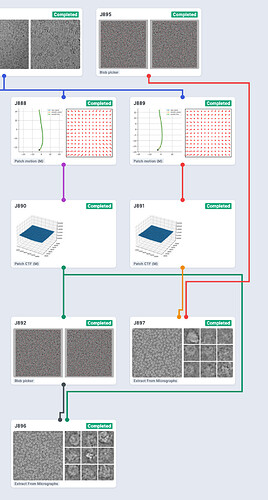
Here’s the resulting workspace. J895 is the modified, re-imported blob-picker job. Note that I also ran Patch CTF on the micrographs before picking the particles and connected those micrographs to the Extract jobs
Hope that helps, let me know if you run into any trouble at some point.


