Hi,
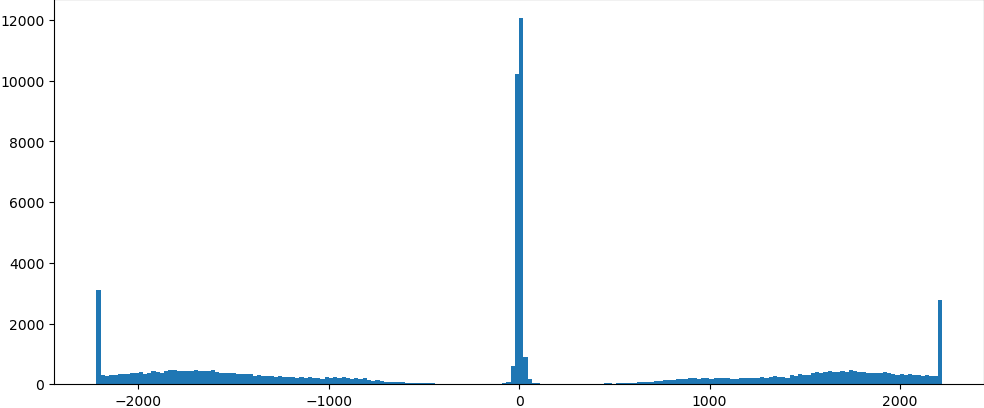
Hello, I did loacl CTF refinement after particle subtraction.The mask was made from the volume map, I set the soft pad of the mask to 20 and dilation radius to 6. I`d like to know what causes this kind of particle distribution and how to set the parameter in oder to remove the particles at the two end in this chart. Thanks.
Kind regards
Hi @Soul,
In general, it’s not recommended to re-run CTF refinement after particle subtraction, because particle subtraction reduces the amount of signal in the data (and can often introduce artefacts if the alignments are not perfectly estimated). If you haven’t already tried it, I would recommend running CTF refinement before particle subtraction, using only the intact particle images. As well, the histogram plots indicate that the majority of particles have a small defocus change (expected), but a bunch of particles have large defocus changes. Large changes are unusual in my experience, and generally indicate that these particles might be junk, or have had incorrect CTF estimates from the first place. So I’d recommend trying local CTF refinement again but before subtraction.
Currently, particles with large defocus changes can’t be filtered and removed from the UI in a simple way. The actual defocus change is not stored or output, so this could only be computed by comparing the job’s input and output cs files, and by manually excluding particles with large defocus changes.
Best,
Michael
1 Like
Thanks a lot , I will re-run the job. I wonder if theres any tutorial or link about how to compare the job’s input and output cs` files, and manually excluding particles with large defocus changes
![]()
Hi,
mmclean,thanks for your advice. Ive loaded the particle.cs file of the CTF refine(L) job into jupyter notebook, and open the dataset array by inputing " particle_dataset.data['ctf/df1_A']", but theres another item names ctf/df2 .Im not sure which item should be the one that used for comparison. Im new to numpy,so I want to know the way to compare the input and output cs files in Jupyter notebook, with an aim to remove the particles that have large defocus changes and save the final selected particles into cs file.
Thanks.
Hi @Soul,
ctf/df1_A and ctf/df2_A represent the defocus along two orthogonal axes, rotated with respect to the micrograph by the astigmatism angle. The astigmatism is kept constant by the local CTF refine job, so both defoci are changed by the same amount. Thus, you can calculate the change in defocus caused by the local CTF refinement by subtracting either field from the pre- and post- refinement particles.
This tutorial shows how to export, load into python, modify, and re-import particle stacks. First you’ll need to export the particles from before local CTF refinement (from the parent job), and from after local CTF refinement. To remove particles with the large defocus change, you can use the following python script (see Option 2: Write your own Python script).
from cryosparc_compute import dataset
import numpy as n

before = dataset.Dataset().from_file(<path_to_exported_parent_particles>) # this is the parent dataset before
after = dataset.Dataset().from_file(<path_to_exported_refined_particles>) # this is the dataset after local CTF refinement

defocus_thresh = 500 # maximum change in defocus to keep, set this to the value in A as you wish

# check that the datasets are ordered identically
print(n.all(before['uid'] == after['uid'])) # should be True

# show histogram of defocus change
fig1 = plt.figure()
plt.hist(after['ctf/df1_A'] - before['ctf/df1_A'], bins=200)
plt.savefig('<path_hist_before_filtering>')

# filter based on defocus
mask = n.abs(after['ctf/df1_A']-before['ctf/df1_A']) < defocus_thresh
after_filtered = after.subset_mask(mask) # these are the particles with defocus change less than defocus_thresh

# see updated histogram
fig2 = plt.figure()
plt.hist(after_filtered['ctf/df1_A'] - before.subset_mask(mask)['ctf/df1_A'], bins=200)
plt.savefig('<path_hist_after_filtering>')

# Now save output dataset, overriding the previous exported particles
after_filtered.to_file(<path_to_exported_refined_particles>)
Then you should be able to pick up from here and run the Import Result Group job.
Best,
Michael
3 Likes
Great ! Thanks a lot for your detailed explaination. The resulting partilces can be used for further refinement job.
Regards
Soul
1 Like