Applying micrograph denoiser to motion corrected data - query

Hi,

Two queries re micrograph denoiser:

  1. Does the version of Patch Motion implemented in Live create the background subtraction training data needed for Micrograph Denoiser? It seems to perform background subtraction, so it should do I guess?

  2. Does the background subtraction needed for Micrograph Denoiser training data strictly require movies? Or can one run pre-aligned data through Patch Motion in Live, just for background subtraction, and use the results for Micrograph Denoiser?

This would be useful for when one downloads data from EMPIAR, which may already be motioncorrected, to allow for denoising of this data in the absence of movies. Currently Live allows the user to pretend that micrographs are movies for the purposes of Patch Motion, but “regular” Patch Motion does not.

Cheers
Oli

Hi @olibclarke!

Yes, Live’s patch motion correction will produce the necessary information to use the pretrained denoising model. (You won’t be able to train your own, since that strictly requires movies). I suppose you could then pick particles on those denoised micrographs and use Reassign Particles to get back to the original micrographs.

We have a note to consider how the Micrograph Denoiser can be extended to handle micrograph sources other than v4.5+ Patch motion Correction.

I hope that helps!

Thanks Rich - why does training the denoiser strictly require movies? I wasn’t entirely clear on this from the description in the guide

Also, how much does the quality of the training data impact the performance of the model? E.g. if micrographs with gold edges or high contrast contaminants are included in the training set, will this negatively impact the quality of the denoising results? We have definitely found that training a model performs much better than using the pretrained model.

Would love to see this incorporated into CS Live, using say the first 200 good mics for training a denoising model and then denoising on the fly for visualization - would help a lot for “at a glance” interpretation of particle behavior, particularly for small particles, which can be important when checking different regions of a grid. Could also help on the fly blob picking…

Why does the denoiser require movies?

Formally, the denoiser requires half micrographs, but these can only be generated by producing separate micrographs from even and odd frames of movies.

The half micrographs are required because the denoiser model is trained using two noisy estimates of the same data. As explained in the original Noise2Noise paper (by which the denoiser is heavily inspired), having two estimates of the same data with independent noise makes it possible to model the underlying noiseless images.

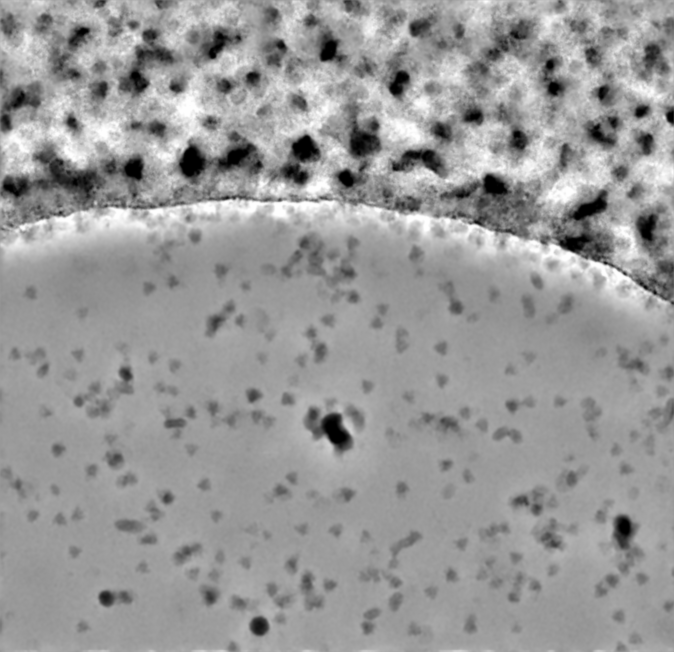
For an intuitive example, consider these two “half-images” which I’m telling you look identical, except for noise:

Since you know that, in the noiseless case, these images should be identical, you know anything that differs between the two half-images is noise (there’s an analogy to be made here with the GSFSC as well). Knowing this, you can produce a denoised image (ideally, just the letter A on a white field). This is the underlying principle of Noise2Noise and the Micrograph Denoiser.

Let me know if it’s still not clear why training a new model requires movies/half-mics! I’m still figuring out the best way to explain it :slight_smile:

How much does the quality of the training data impact performance?

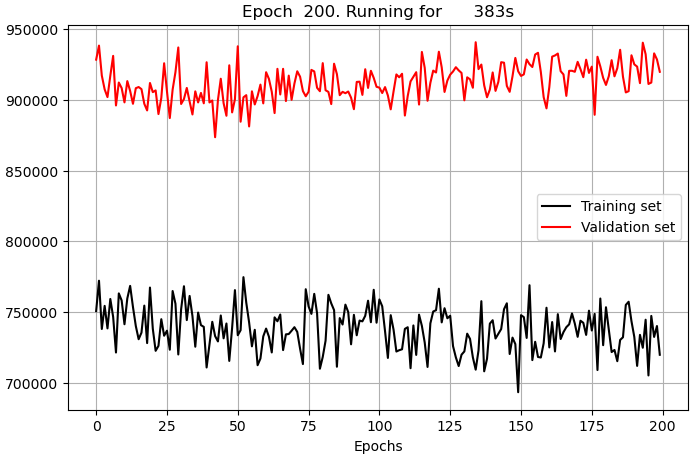
I haven’t done enough extensive testing to give you a quantitative answer here, unfortunately. In my experience, it’s rather robust with regard to the number of training micrographs and the amount of those micrographs covered by ethane contaminants, ice crystals, hole edges, etc. If the grayscale estimate is bad, that does hurt performance.

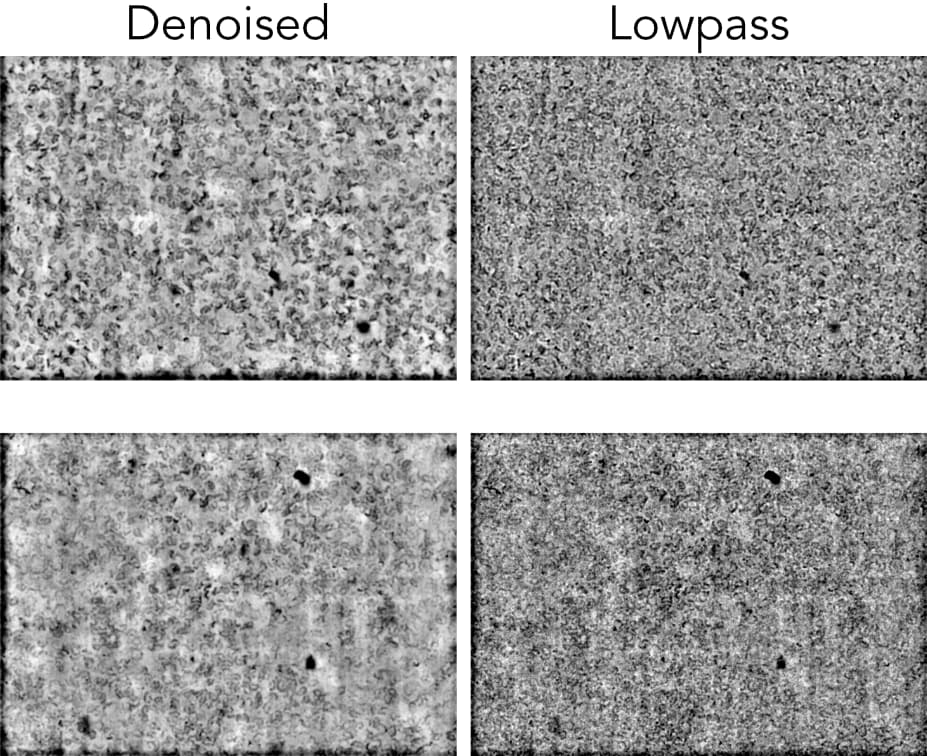
I quickly pulled 16 movies from EMPIAR 11632 (chosen just because I had it to hand) which had a lot of carbon or ice and trained a denoiser using just those 16 movies with otherwise all default settings. I think it did pretty well, considering:

Indeed, if you have or find any examples where training fails to produce a good denoiser, I’d be interested in seeing them!

Feature request

I’ve recorded your request for adding the Denoiser to CryoSPARC Live!

8 Likes

Ah… got it… that is what was meant by half micrographs, now I understand, makes perfect sense! Thanks!

2 Likes

I’ll add more clarification to the guide on what half-mics are, thank you @olibclarke!

2 Likes

Presumably the even/odd sets are taken with the alignments from patch motion pre-applied then?

Right — we use the rigid motion from the whole movie to align all the frames before splitting them (so they’re not independent, but we don’t want them to be anyway).

1 Like

One more question sorry - is the gain reference used during this process (presumably yes during rigid motion correction)?

I presume that if there is residual fixed pattern noise (which will be the same in even/odd sets) this will not be well corrected by the denoiser?

(by the way, if you want an example with incomplete gain correction for testing, try EMPIAR-10828 - making a gain from averaging the movies substantially improves data quality in this case)

Yes, the gain reference is applied during half-mic generation and motion correction.

Good question about fixed pattern noise. My guess is that it might be less important than you’d expect, since the micrographs are pretty significantly downsampled during training, so typical gain ref problems (like a line of bright/dim pixels) might not show up as brightly. Let me test and get back to you.

1 Like

Hi @olibclarke! Ran a quick test with just 50 movies from 10828.

My intuition was not quite right — the bad (or, really, absent) gain reference does impact the results. However, I still find them subjectively more interpretable than a 14 Å lowpass filter.

To get this result, I had to adjust the grayscale normalization factor a bit (down to 0.5) and increase the edge crop to 0.1 to remove the dark areas at the edge of the frame.

Hello,

Super helpful explanations @rposert, thank you!

Since this discussion drifted to explaining how the denoiser works, I figured I would ask this new question here (the answer doesn’t seem to be in the documentation, and a quick search in the forum turned up this discussion).

How should I interpret the line plots produced during training? I got two very different plots from two presumably very similar datasets (same microscope settings, same grid type, same protein; otherwise two slightly different protein concentrations and buffer conditions). In both cases the denoised micrographs look good (I haven’t checked systematically yet, but the few micrographs displayed as the job is running look good for both datasets).

Dataset with lower protein concentration:

Dataset with higher protein concentration:

Some specific questions:

  1. What does the vertical axis represent in these plots?
  2. Which behavior is indicative of successful training? Higher values for the validation set compared to the training set? Similar values between the two sets?
  3. Which behavior indicates overfitting?

This could probably be added to the documentation.

Hi @Guillaume, glad the explanations were helpful!

To be frank, I would recommend you don’t pay much attention to these line plots. The plots show the model’s “loss” (i.e. objective function value) during training, but the units are arbitrary. The model uses a weighted combination of multiple loss functions internally, and the weights change during training, making the trends of both training and validation curves difficult to interpret.

Furthermore, the difference between runs or similar datasets is often due to the fact that validation images are randomly selected at the start of training, and if they happen to contain more junk/high contrast regions in a given run, the validation curve will start/end at a very different loss value than the training curve. In addition, the denoiser is tuned to emphasize repeated structure in the denoised output images (e.g. particles), so it may get “worse” at denoising junk (carbon/gold/ice crystals, etc) during training, while getting better at denoising particles - making the loss curves even more difficult to interpret.

In my anecdotal experience, I have not observed a correlation between the appearance of these plots and the quality of the denoised micrographs. I would recommend instead relying on the appearance of the normalized image (to assess the input grayscale) and the final denoised image.

And as you likely already know, we never recommend extracting particles from denoised micrographs for downstream processing! CryoSPARC’s extraction jobs automatically extract from raw micrographs by default for this reason.

I hope that helps, please let me know if you have any more questions! And I’ve noted that I should consider adding a note to this effect to the guide!

2 Likes

Good to know, thank you!

And this is exactly how I went about it: saw that the denoised micrographs looked easy to pick, went with it, the downstream steps worked well. I would probably not have noticed the loss curves if I had been working on a single dataset, but in this case the fact that they were so different for seemingly equivalent datasets and denoising results caught my attention.

One thing I observed though: the denoised micrographs don’t play well with topaz training and picking. In principle, it doesn’t matter which mics (raw or denoised) one uses to train topaz, as long as the picking job using the resulting model is applied to the same mics.
But when I switched “used denoised mics” on for both topaz picking and training, I got nonsensical picking results. They look to me as if the denoised mics were downscaled by some factor that was not accounted for in my topaz settings (I assumed the denoised mics would have the same size as the raw mics): all picked coordinates cluster in a rectangular fraction of the mic (something I observed before, using topaz stand-alone on the command-line, when rescaling the coordinates by a wrong factor that doesn’t match the downscaling factor applied to the mics).
Not a big deal: re-running both topaz training and picking on raw micrographs worked nicely. But I realize now that these options might be designed only for mics denoised by topaz? If so, it would be helpful if the info bubble of these parameters (displayed when hovering the mouse on the parameter in the job builder panel, or displayed in full next to the parameter in the “Inputs” tab of the job view) mentioned that this only works for mics denoised by topaz.

Yes, we’ve noticed the same thing regarding the performance of Topaz on CryoSPARC-denoised micrographs (there’s a callout in the guide on this topic, but it’s near the bottom). At present, it’s still best to use Topaz denoise if Topaz will be used to pick micrographs.

I will note that, in our experience, blob picking on CryoSPARC-denoised micrographs works exceedingly well. I rarely feel the need to re-pick micrographs with templates or deep pickers. Of course, this will be sample and contrast dependent – some things certainly still benefit from re-picking, but I personally no longer treat it as part of the critical path :slight_smile:.

2 Likes

Ooh this is very interesting to know, thank you! I will definitely try this denoiser + blob picker combo.

Manually picking a training set for topaz, then picking with topaz, has been my go-to since a project in which it made an enormous difference. The same dataset picked by LoG+template (it was with RELION) or by topaz trained on manually picked coordinates resulted in us being doubtful the binding factor was even in the dataset at all or being totally confident it was present, respectively (it was for this paper).
I have since then kept this workflow as a safe default. The manual picking is of course a bit time consuming, but I see it as an investment since it gives me a very good sense for what to expect from the dataset. So I will probably keep doing this, but with denoised mics.

1 Like

Can confirm that blob picking on CS-denoised mics is now our go-to starting point also - sometimes followed up with topaz using a curated set of picks (but training on non-denoised mics).

2 Likes