High resolution image of 2D classification

Thank you @rj.edwards for the useful tips. May I ask one more question? I tried to download the 2D class average from the output of the 2D class job and open them in Fiji as @rj.edwards suggested, but it seems like the box size of the 2D class average I downloaded was reduced to 128 pixels. When I extracted the particle, the box size was 428 pixels. I’m not sure if I was downloading the 2D average from the right place. Is there a way that I can get the 2D class average that has the same box size as the original particle box size (i.e. 428 pixels)? I’d appreciate any suggestion. Thank you so much!

Best,
Meiling

Hi Meiling, by default the box size of 2D classification I think is controlled by the Maximum Resolution input parameter.

By default this is 6Å, so the box size for 2D is reduced to speed things up. If you want to get larger box size images, you can run 2D with a higher maximum resolution (say 3 Å), while keeping the maximum alignment resolution limited to 6Å so that the classification results are equivalent.

Cheers
Oli

Thank you @olibclarke for the information. I am running 2D classification with a 3Å maximum resolution as you suggested. Hopefully, I will get a bigger box size for the 2D average!

Best,
Meiling

Hi @stephan
I tried your suggestion of using the plotutil function in a jupyter notebook but got the following error:

import os

os.chdir(os.environ[‘CRYOSPARC_ROOT_DIR’])

from cryosparc2_compute import plotutil

from cryosparc2_compute.blobio import mrc


ModuleNotFoundError Traceback (most recent call last)
ipython-input-1-073baef4faa3 in module
2 os.chdir(os.environ[‘CRYOSPARC_ROOT_DIR’])
3
----> 4 from cryosparc2_compute import plotutil
5 from cryosparc2_compute.blobio import mrc

ModuleNotFoundError: No module named ‘cryosparc2_compute’

My bashrc file contains:
export CRYOSPARC_ROOT_DIR=/home/cryosparc/cryosparc_worker

This directory has the cryosparc_compute directory. Do you know how I can fix this?

Hi @lizellelubbe,

In the v3.0 upgrade, we renamed cryosparc2_ to cryosparc_ for most of our internal modules. If you replace cryosparc2_compute with cryosparc_compute in lines 4 and 5, does the script still run?

Michael

Hi @mmclean,
Unfortunately not although thanks for pointing out that cryosparc2_ was renamed, I didn’t realize it.
This is the new error:
image

I can try to install a virtualenv using cryosparc’s python and then install jupyter notebook using the virtualenv. Perhaps that can help to run this?

I just installed a virtualenv using cryosparc’s python (virtualenv -p /home/cryosparc/cryosparc_master/deps/anaconda/bin/python3 env3) as well as a new jupyter notebook, numpy, scipy, numba, matplotlib and pyFFTW (all in env3). Unfortunately still running into errors:

image

Hi @lizellelubbe,

The best way to use Jupyter to leverage cryoSPARC modules is to start it in the same python environment.
To do this, run the following commands on the master node:

cd cryosparc_worker
# activate cryoSPARC's worker environment in your shell
eval $(./bin/cryosparcw env)
# jupyter doesn't come installed by default
conda install jupyter
# start the jupyter server
# ./bin/cryosparcw start_ipynb <port number>
./bin/cryosparcw start_ipynb 39011

The start_ipynb command will start the jupyter server in a screen on your machine. You can access the UI by navigating to the port (localhost:39011; if the server is remote, you may need to forward the port first). You can kill the server by entering the screen screen -r and pressing CRTL+C.

Hi @stephan
Thanks for the reply.
I have tried your recommendation but got stuck on the jupyter installation. Should I specify a certain version of jupyter to be compatible with cryosparc (we have cryosparc v 3.2)? I got a very long list of incompatible packages when running conda install jupyter. Which conda returns /home/cryosparc/cryosparc_worker/deps/anaconda/condabin/conda.

lbbliz002@athena:/home/cryosparc/cryosparc_worker$ conda install jupyter
Collecting package metadata (current_repodata.json): done
Solving environment: failed with initial frozen solve. Retrying with flexible solve.
Solving environment: failed with repodata from current_repodata.json, will retry with next repodata source.
Collecting package metadata (repodata.json): done
Solving environment: failed with initial frozen solve. Retrying with flexible solve.
Solving environment: -
Found conflicts! Looking for incompatible packages. failed

UnsatisfiableError: The following specifications were found
to be incompatible with the existing python installation in your environment:

Specifications:

  • wcwidth==0.2.5=pyh9f0ad1d_2 -> python[version=’>=2.7,<2.8.0a0’]

Your python: python==3.7.9=hffdb5ce_0_cpython

If python is on the left-most side of the chain, that’s the version you’ve asked for.
When python appears to the right, that indicates that the thing on the left is somehow
not available for the python version you are constrained to. Note that conda will not
change your python version to a different minor version unless you explicitly specify
that.

The following specifications were found to be incompatible with a past
explicit spec that is not an explicit spec in this operation (pip):

  • jupyter -> ipykernel -> importlib-metadata[version=’<5’]
  • jupyter -> ipykernel -> ipython[version=’>=4.0.0|>=4.0|>=5.0|>=7.23.1,<8.0’]
  • jupyter -> ipykernel -> ipython_genutils[version=’>=0.2.0,<0.3.0’]
  • jupyter -> ipykernel -> tornado[version=’>=4,<6|>=4.0|>=4.2|>=4.2,<7.0|>=6.1|>=5.0|>=5.0,<7|>=4.1,<7’]
  • jupyter -> ipykernel -> traitlets[version=’>=4.1|>=4.1.0,<6.0|>=4.3.1,<6.0.0|>=4.3.1,<5.0.0|>=4.3.1|>=5.0|>=4.2|>=4.2.1|>=4.3’]
  • jupyter -> jupyter_console -> pexpect
  • jupyter -> jupyter_console -> pygments[version=’>=2.4.1’]
  • jupyter -> nbconvert -> jinja2[version=’>=2.4’]
  • jupyter -> python[version=’>=2.7,<2.8.0a0’] -> ca-certificates

(I truncated the list here)

The easiest way to do this is @rj.edwards suggestion of opening the stack in Fiji (you can actually tile the images using Image>Stacks>Make Montage). You can also conveniently interpolate to a larger box size at this point using Image>Adjust>Size. (Example 2D class below, box size 320 upsampled to 640)

But you will still be limited by the internal box size of the original 2D classes - to change that, you’ll want to change the maximum resolution used for reconstruction in 2D to ~Nyquist, while leaving the maximum alignment resolution to whatever you were using (default is 6 Å).

The only inconvenient thing about this is that cryoSPARC uses the maximum resolution for reconstruction at each iteration, rather than just at the end, and this slows down the job. @team would it be possible to have an additional parameter, “Maximum resolution for final iteration”? That way we could have intermediate iterations calculated at a smaller box size for speed, with the final iteration calculated at the original box size of the particles, for the nicest 2D classes?

Cheers
Oli

2 Likes

I’m using the cryosparc modules in jupyter-lab in the following way.

Please replace the directory paths for your environment.

(1) Activate worker conda environment

[cryosparcuser@gx03 /amorphous/cryosparcuser/cryosparc/cryosparc_worker]
> source deps/anaconda/envs/cryosparc_worker_env/bin/activate

(2) Install ipykernel module

(cryosparc_worker_env)
[cryosparcuser@gx03 /amorphous/cryosparcuser/cryosparc/cryosparc_worker]
> conda install ipykernel

(3) Install the kernelspec for the cryosparc worker python environment

(cryosparc_worker_env)
[cryosparcuser@gx03 /amorphous/cryosparcuser/cryosparc/cryosparc_worker]
> ipython kernel install --user --name cryosparc_worker_env --display-name cryosparc_worker_env

Installed kernelspec cryosparc_worker_env in /usr/people/cryosparcuser/.local/share/jupyter/kernels/cryosparc_worker_env

Then logout/re-login to reset environment variables.

(4) Install and activate a fresh anaconda environment

(If you laready have your own anaconda, then skip this step and just activate your virtual environment.)

Get an installer of the latest anaconda and execute it.

[cryosparcuser@gx03 ~]
> ./Anaconda3-2021.11-Linux-x86_64.sh

Tempolarily activate the anaconda environment.

[cryosparcuser@gx03 ~]
> eval "$(/usr/people/cryosparcuser/anaconda3/bin/conda shell.bash hook)"

(5) Make sure the installed cryosparc kernelspec is recognized

(base)
[cryosparcuser@gx03 ~]
> jupyter kernelspec list
Available kernels:
  cryosparc_worker_env    /usr/people/cryosparcuser/.local/share/jupyter/kernels/cryosparc_worker_env
  python3                 /usr/people/cryosparcuser/anaconda3/share/jupyter/kernels/python3

(6) Launch jupyter-lab

(base)
[13:35:01 cryosparcuser@gx03 ~]
> PYTHONPATH=/amorphous/cryosparcuser/cryosparc/cryosparc_worker jupyter-lab --ip=0.0.0.0 --no-browser --notebook-dir='/' --port=8888

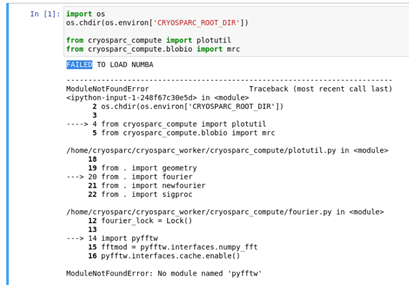
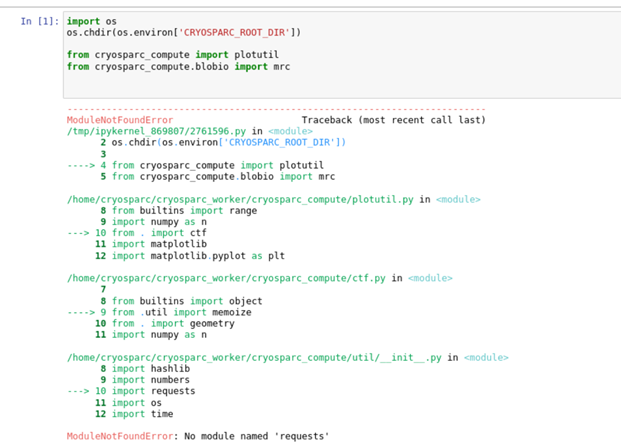
Specifying the PYTHONPATH is important.

Access the jupyter-lab server with your web blowser.

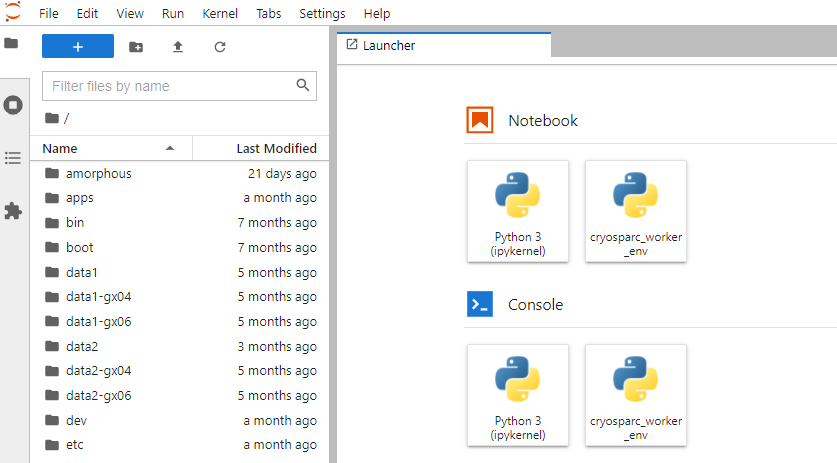
Then you can see the installed kernelspec as an available kernel for Notebook/Console.

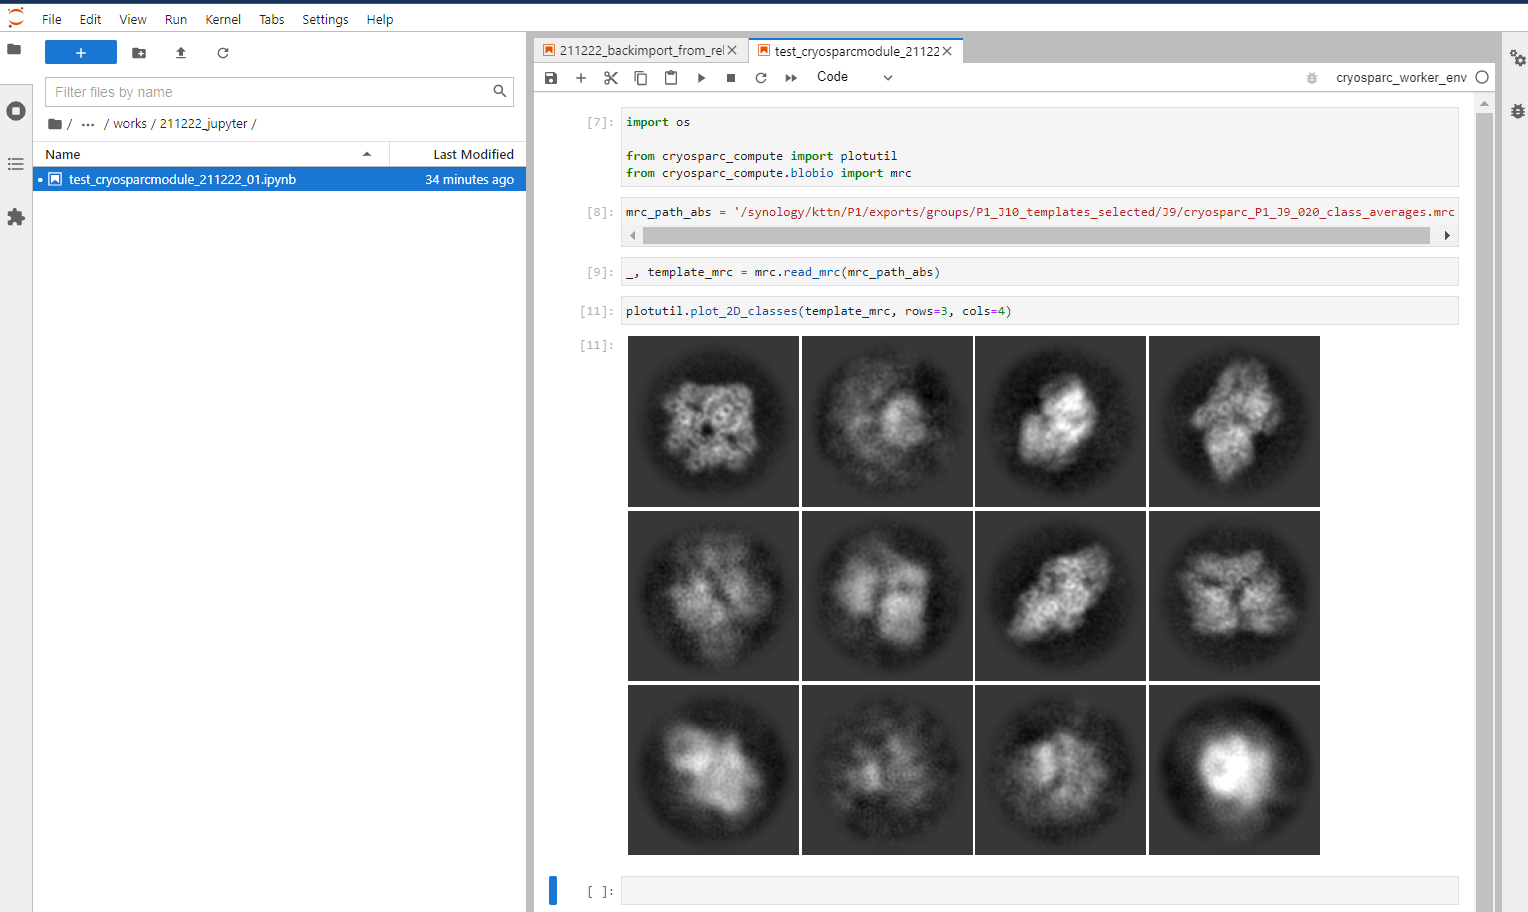
Launch a new notebook with the cryosparc_worker_env kernel selected, then you can use the cryosparc module.

Hope this helps.